Open
Color model in Model Studio.
Color model
QUICK START
1. Open Model Studio → New model project → Color model. Upload an STL, 3MF or OBJ. Project name is optional. Choose Model units for STL/OBJ; a 3MF retains its own units.
2. In How should it look?, describe the paint job. Example: "Body tan, hat and shirt red, pants blue, shoes black." You can name a character or theme; include important colors and details for a more predictable result. A description is optional when using body/feature colors alone.
3. Optionally set Body color, Eye style and Eye color. Select existing accessories and choose their swatches. Vehicle & prop features has more choices. Specific description colors take priority. Keep existing model colors preserves embedded colors before requested changes.
4. If needed, open Model orientation and choose Front direction and Up direction on different axes. This helps eye placement without rotating printable geometry.
5. Select Create color model. The shared mesh repair checks or repairs a private copy first, then AI recognizes visible parts and applies colors.
6. Rotate every side of the result and read Needs placement review. Download the colored 3MF to retain colors; STL has geometry only. Continue in Slicer Studio to map colors to filaments/tools and inspect sliced layers.
REPEAT THE HAMMER SAMPLE WITH ONE UPLOAD
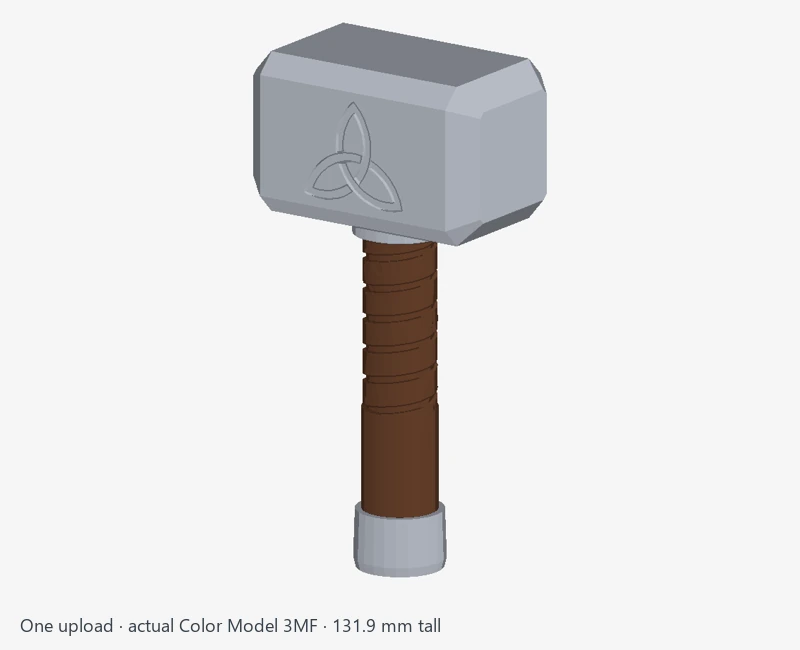
Download the complete uncolored STL from the sample card above and upload it once in Color model. Use millimeters. For the silver-gray head and pommel with a brown grip, enter this in How should it look?:
Base color #B8BEC8, grip #67412C. No added graphics.
Alternatively, leave that description blank, set Body color to #B8BEC8, and under Vehicle & prop features enable only Grip and set it to #67412C. Leave Handle unchecked for this example. Select Create color model and follow its queued generation. Rotate the result to review every side, then download the colored 3MF. The engraving is on the +Y side; rotate the preview to see it, or choose Front direction +Y under Model orientation.
Both methods were tested on the complete hammer through the normal upload, queue, color worker and saved 3MF. The sample card now contains an actual single-upload result with its settings and generation report. Geometry and its original engraved emblem are preserved. Other uploaded models and descriptions still need visual review.
DETAILS AND TROUBLESHOOTING
Under New model project, choose Color model and upload an STL, 3MF, or OBJ. Project name is optional; leave it blank to use the uploaded file name. Choose units for STL/OBJ; 3MF retains its own units. Before applying colors, Color Model uses the same bounded mesh repair as Slicer Studio: duplicate/degenerate triangle cleanup, face-direction correction, small-hole filling, and its CPU Manifold fallback when needed. Repairs are made in a private copy; your original upload is kept. Each imported object is checked separately to retain its name and embedded colors. New repair surfaces inherit nearby colors before the color plan is applied. Models that cannot be repaired safely are blocked with a clear message. Queued jobs reserve one generation allowance; failed repairs, failed AI jobs, and cancelled jobs return that allowance without changing a later daily window. Finished results show Mesh repair as Checked or Repaired before coloring.
Start with “How should it look?” Describe any character, theme, paint scheme, or individual part colors. The local AI uses your description and a neutral-gray view of the uploaded model to propose a base palette, semantic parts, and suitable surface markings. There is no character preset menu, and file names do not select a paint scheme. For example, upload a race car and describe the character you want it painted like, or describe a hammer's desired finish. You can also request your own design, such as an olive body, tan roof, black tires, and an orange stripe.
Body, eye, and accessory controls are optional refinements. Description colors override feature swatches. The AI can propose parts beyond the checkboxes, such as armor plates, a cape, or trim, when those parts are visibly present. It paints the existing geometry; it does not add missing accessories or change the model into another object. With no description, the selected colors and feature controls are used.
Eyes: solid, real, monster, bird, cat, dragon, and super hero styles are available. The local vision model locates visible eyes and SAM2 traces their boundaries. Eye artwork stays inside those recognized regions; unrecognized eyes are left unchanged and reported. Cat and dragon styles use narrow pupils. These are color regions, not added eyeball geometry. If the model faces another direction, open Model orientation and select its Front and Up directions. These must use different axes. The colored preview faces the selected front; the printable STL/3MF coordinates are unchanged.
Accessories: Color Model renders six views of your repaired mesh privately on this server. Pretrained Qwen3-VL 4B Instruct recognizes visible parts, with a second independent classification pass to reject mislabeled regions; SAM2.1 Tiny segments their boundaries. These masks are projected back onto the actual mesh triangles, including subpixel faces with depth checks. Hidden faces of a separately connected component can inherit its dominant AI-recognized part label; components with competing accessory labels are not flattened to one color. Eye requests also check full-resolution close-up views of a recognized head. Hat, hair, shirt, pants, shoes, wings, tail, beak, wheels, windows, headlights, hammer head, handle, and grip controls are available as shortcuts; descriptions can request other existing parts. Unknown or unlocated parts appear in Needs placement review instead of being reported as successfully identified. Connected, hidden, tiny, or ambiguous details can remain unresolved. There is no silent geometry-rule fallback when neural recognition fails.
Description-driven artwork: the AI can propose bounded text, symbols, stripes, spots, checker patterns, or painted eyes on recognized surfaces. These are approximate markings clipped to the AI-located region. Missing or uncertain regions and markings appear in Needs placement review. Named references can be misremembered, so include important colors and details in the description for a more predictable result. Fine logos, tiny lettering, complex artwork, material finishes, and exact character likeness may be incomplete or inaccurate. Review all sides of the colored preview before printing.
Keep existing model colors retains available 3MF/OBJ colors before requested feature changes. Download the colored 3MF to keep per-face colors; STL cannot retain colors. The STL contains the repaired geometry. The GLB preview retains distinct region colors. Coarse faces may be subdivided in GLB/3MF to carry detail, with no change in shape. Review every side and map the colors to available printer filaments/tools in Slicer Studio before printing.
Color jobs use the same durable AI queue as Photo to 3D and image editing, so only one GPU generation runs at a time. Signed-in priority and the ten-member/one-guest fairness rule apply. Recognition runs locally on the RTX 3050; rendering and segmentation use CPU/RAM. The model service listens only on loopback, and model renders are not sent to an outside AI service. Private inputs follow the seven-day cleanup policy; saved STL/GLB/3MF outputs are retained.
Model Studio remains under development. Color placement and usable results may vary or fail. Exact likeness needs visual review on the actual uploaded model; automated fixture tests do not guarantee character recognition.
WORKSPACE, SAVED PROJECTS AND PREVIEW CONTROLS
Choose a generator under New model project; the Instructions button follows the selected tool. Define your model in the setup card, then follow generation and checks in the build table. Saved projects can be searched by name or tool and filtered by status. Refresh projects updates the list without discarding the setup form.
In a completed project, Fit model, Top, Front and Bottom help inspect every side. Drag to rotate, pinch to zoom, and use two fingers or Shift-drag to pan. Pan view makes a one-finger drag pan the preview. Color, Solid and Wireframe inspect different aspects of a colored result. If the color preview cannot load, the solid STL remains available and Color retries the textured view. Preview cameras and display modes do not change the exported geometry.
Clear / start over resets the current workspace while keeping the selected generator. Saved projects and earlier versions are kept. A Reconnect notice lets you recover after a connection interruption. The page pauses background queue checks and refreshes status when you return.
KEEPING COLORS WHEN MOVING BETWEEN TOOLS
Keep the colored 3MF when retaining printable colors. An STL handoff contains geometry only. Import the colored 3MF into Slicer Studio, keep its supported color assignments, and map each used color to the correct filament/tool. Color model does not select your printer or make a single-tool printer automatically switch filaments.
RELATED INSTRUCTIONS
Model Studio tool directory ·
Slicer Studio ·
Support Fin Studio ·
Community models ·
Android app setup ·
Report a problem
 P0k3sm0t